When you have mature skin, makeup foundation can be confusing.
You could be adding years to your skin with the wrong foundation products and application. Keep your healthy youthful appearance with these foundation essentials and correct application.
(Plus, one new product that packs a big promise to change your makeup experience. See it at 3:20)
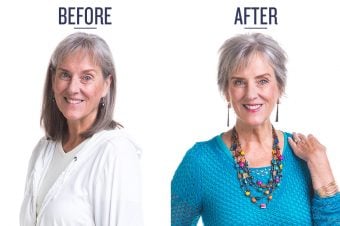
As we age our skin begins to show more lines, wrinkles, texture, and hyperpigmentation (color spots; darker and lighter). The best way to prevent, correct, and slow down these processes is with specifically formulated skin care products and practices. My anti-aging skin care line helps you restore your healthy radiant skin for a more youthful feel and appearance. After that, makeup becomes an enhancer, highlighting and bringing forward your natural beauty.
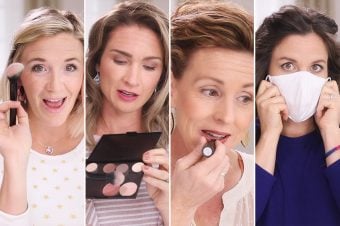
Now that you’ve got your skincare covered, let’s move on to my quick 7-step foundation process that takes years off your appearance in just a few short minutes. I’m joined by our Dressing Your Truth Makeup Expert, Anna K. who offers her tips and tricks for mature skin prep to create a smooth canvas for your true to Type makeup colors.
Your simple steps, tools, and products for smooth radiant ageless skin (starts at 3:20):
- Use the correct tools: Duo Concealer Brush, Buffer Foundation Brush, Powder Brush, and Brow Duo Brush.
- Minimize wrinkles with Instant Action Wrinkle Smoother.
- Prime with Retexur Creme Face Primer.
- Conceal (A LOT of women are missing this step, or doing it wrong. Watch at (6:35) to make sure you are doing it right) with Concealing Cream.
- Use a liquid foundation with the buffer brush, I use Studio Blend Cover Foundation. Satin Finish Foundation works well too.
- Finish and set with Oil Control Blotting Powder. Great for quick touchups throughout the day too!
- Define your brows with Brush on Brow powder, then set with Brow Set.
All done, and ready for color!
Get even more info on how I turned back the clock to reclaim vibrant healthy skin:
- Carol’s Anti-Aging Skincare Routine: Fewer Products, More Benefits
- My Top 5 Tips On How I De-aged Myself the Past 5 Years
- 20 Lifestyle Secrets That Keep You From Aging Prematurely
Video Transcript
Carol: When you have maturing skin, foundation can be confusing and even questioning because you certainly don’t wanna add years to your face. We both got some tips and tricks to teach you how to keep your youthful appearance.
I’m 61 and so I definitely have maturing skin. Although I do a lot of things to maintain very healthy skin. You can actually read about those by clicking on the link in the copy.
Anna K: And you do, you have great skin. It’s beautiful.
Carol: Yeah, I learned too late in a manner that I’ve had to do a lot of skin recovery and kind of claim back my skin’s health, but I’ve been able to achieve a lot of benefits from my practices, and now I’m really committed to maintaining as healthy of a skin as possible. And foundation for me is a big piece of dressing my truth especially as a Type 3, because foundation really sets my face for the color.
Anna K: Oh, absolutely. It makes a perfect canvas. But if you don’t have the right foundation, it could be disaster.
Carol: Yeah, what I found…let’s even list some issues that we can face as our skin matures. Now, you’re 46, I’m 61, you don’t appear to have aging skin.
Anna K: Oh, that’s
Carol: …one in play again, you know. Even get the youthfulness when you have a secondary type 1.
Anna K: Don’t you just like or even more?
Carol: You’re aware though that we get more texture around our eyes, no matter your type. If you’re maturing, you’re going to get more movement here, here, yeah, here, coloration changes. You know you might get…
Anna K: Oh, pigmentation…
Carol: Hyperpigmentation.
Anna K: …under the eyes, around the nose, around the mouth. All of that is just…
Carol: A lot of women feel frustrated with dark circles under their eyes. So…
Anna K: Bags.
Carol: I am here, I have no makeup on. You may have noticed that already because I’m gonna show you my routine that I think applies to any type. This is not Type specific, this is more age preference that if you have maturing skin, what I do I think will give you some real ahas and advantages in your own foundation process. And so one of the first things I wanna mention is your skin will look younger with a liquid foundation, in my opinion.
Anna K: Absolutely.
Carol: I’m not using our powder foundation.
Anna K: The two-way powder…
Carol: The two-way, it’s gotta be liquid for me. In fact, I use two of our three options because one is a little too light. The tint that we sell is a little too light for me, I want a heavier coverage. And so today, we’re working with this foundation.
Anna K: The Studio Blend Foundation, and it’s got a full-coverage.
Carol: Yeah. I love this and a little goes a long way. Type 3s do not push the pump down all the way. You’re putting three days worth of foundation on your face, and that’s gonna look funky to because you’re gonna go, “Okay, does that…”
Anna K: Now, what do I do with it? But I have it on my hand so I gotta use it.
Carol: You don’t want any separation between your skin and the foundation, but we’re gonna start first with a new product that we swear by. It’s called Instant Action Wrinkle Smoother. I’m gonna use it under my eye and on my upper lip. This takes a very tiny amount.
Anna K: Minuscule. I mean, yep, that’s even too much. Give half of that, I want some. Here, I’ll save this for you there.
Carol: Okay. I’m gonna dot, dot, dot, dot. Now I’m gonna pat.
Anne: Yeah. Pat, pat, pat underneath the eye, go all the way up. Good. But you saw how minimal that was? And Carol is not gonna talk for a second because you have to let it dry. And once it’s dried, you can actually see, I know, you can feel it working, it’s so amazing. But it doesn’t look like…
Carol: Not really. It’s just, like, whoa…
Anna K: Can you feel that?
Carol: Yeah, look at the lip.
Anna K: Yeah, it’s amazing. I watched it change. I watched it change.
Carol: I’m having a QVC moment with you and I.
Anna K: I feel like…but I watched it change.
Carol: Those are all type 3 selling you stuff on that channel.
Anna K: Yeah, it’s good stuff, I love this one.
Carol: Okay, step number two.
Anna K: Primer, face primer.
Carol: It’s very important you have these two tools. The buffer brush is going to be my application for several of my steps and the concealer brush. I’m the reason we now sell this. The makeup blender and I were never BFFs. So I came in and I’d actually bought a similar product off Amazon, I wanted to try something that was this quality of a brush with this…
Anna K: She showed it to me and…
Carol: …buffer quality and I said, “You know, I could sell a lot of these because this thing is amazing and it’s all I’m gonna be using.”
Anna K: Well, I think this is actually better than the one that you had.
Carol: Yeah, it is. So again, one pump, I dot it.
Anna K: Dot, dot, dot.
Carol: These are my four areas now that I’m working with. I’m gonna…
Anna K: Now, this already has makeup on it from when she used it before and that’s fine.
Carol: And you can see my movement is very Type 3. It’s…
Anna K: It’s quick and easy.
Carol: Kind of like I’m painting a wall here, getting in there.
Anna K: And the nice thing…
Carol: I’m very firm in my pressure.
Anna K: Which is great because it really gets into your face.
Carol: And I go into my scalp down onto my neck.
Anna K: So what this does for you is that it puts a barrier between you and your makeup allowing your skin to hold its moisture and if your skin’s holding its moisture, it’s gonna stay hydrated, it’s going to stay more plump, it’s gonna have a lot less of the mature skin issues.
Carol: It’s smoothing the whole face out in a way.
Anna K: It really is.
Carol: Where this product is just giving extra smoothing effect to those areas. That primer is really smoothing the entire face. It helps the foundation go on very easily.
Anna K: You’ll feel a difference in it too, and it does. It takes a second for it to dry so just give it a minute for it to dry. But there is a difference between the Instant Action Wrinkle Smoother and the primer. The primer preps the rest of the makeup to come on where this actually helps in these concentrated areas, and your forehead and around your lips.
Carol: My next step is very important. I think it is the step that is my essential step that really helps my skin look healthy, youthful, smooth, and the coloring very healthy.
Anna K: I think it sets it apart.
Carol: So I’ve taken our concealer, I’m using…
Anna K: You’re using the light medium.
Carol: Light-medium and I like to work with this area as my palate and I’m using the concealer brush now. These are the areas that I now wanna work with the concealer.
Anna K: And it’s important to use this part of your hand because it won’t absorb as much as if it were in another part. You don’t wanna put it on your palm, you don’t wanna put it on the back of your hand, you really do wanna use this on top of your thumb area.
Carol: I go over any redness that’s just standing out to me. I always do the top of my lip, so you see I’m just placing it right now. I go above and below the outer eyebrow and I’m gonna go on each eyelid. Now, I’ve got it placed, I’m gonna use this.
Anna K: This is where the buffer brush is so fantastic because it really gets it into the skin. But remember, you have the primer on so it’s not actually being absorbed into the skin.
Carol: You don’t even see it anymore.
Anna K: Yeah. No, it’s gone and it makes the pores on your skin minimized, it goes into the texture, minimizes it. It’s really a fantastic brush.
Carol: I see a little bit more redness just from my eyewear right there. I’m gonna add a little bit more just under the eye.
Anna K: It’s always okay to go layer. It can be layered which is also fantastic.
Carol: You see I don’t like wasting anything, so I just picked up the rest off my knuckle.
Anna K: But it does have buildability.
Carol: And I might swipe it down the middle.
Anna K: On your T-zone.
Carol: Okay, that to me is essential, that step. That’s where I think a lot of women with mature skin are not using concealer correctly. They’re not knowing how to apply it.
Anna K: Or they just skip it.
Carol: They skip it and it’s such a great evening effect. So now, I will take my foundation. Again, I’m gonna just pump it there and I did way too much, just so you know. I didn’t even follow my own guidelines of half a pump. Do you need any?
Anna K: Probably. Here, give me some of that.
Carol: Okay, now, this is where this brush is like, oh, I love the brush.
Anna K: It floats on air. Do you see how that just really…it blends everything in?
Carol: And over my lips.
Anna K: Cheekbone. And she also hit, again, above and below the eyebrow, yeah. That looks really great. Hit your eyeglass area one more time. Yep, other side.
Carol: I like how you can get right in under the eye.
Anna K: And see how she’s applying it, it’s just these small little swift circular…yep, it’s circular. You just blend it in, blend it in, blend it in. And this really is great for the jawline because you won’t have that line. It’s perfect.
Carol: I love it. This is a finishing step that I like because it just now sets all that I’ve done.
Anna K: Well, what this does…
Carol: And it doesn’t add any color.
Anna K: Yeah, and it’s very, very important that you do this step because it allows the other makeup now to sit on it instead of sliding, instead of moving. So, Carol has the oil control blotting powder with the kabuki brush which is essential because what this does is it sets what you’ve just done. So now, it’s not gonna slide, or slip, or move, and it’s clear. It doesn’t go on white, it goes on the same color as your skin tone. And hit above the eyelash or below the eyebrows too. Yep, just right there, perfect. So that helps prep even for your eye shadow. It’s really great.
Carol: And this brush is cool because you can pinch it…
Anna K: Yeah, you can move it, manipulate it.
Carol: …to get in that areas you need.
Anna K: The further down you get on it, the more control you have.
Carol: But look at how smooth my lip line looks.
Anna K: It’s beautiful and you can’t even see that you even have pores.
Carol: This is a great product as well throughout the day where I don’t wanna add more foundation…
Anna K: Oh, yeah.
Carol: …or color. It will just lift any facial oil…
Anna K: Any oil and it just brings it back…
Carol: …that I’ve produced.
Anna K: …to a good balance.
Carol: To finish off, the non-color steps of my makeup process, brow powder is another essential.
Anna K: So important.
Carol: I use the black-brown. So I’ll smooth out my brows.
Anna K: Now, as you age too, the brows get a little bit coarser, they get a little bit longer, they get a little bit crazy. So having the right color is really important to kind of put them back into their place, so to speak.
Carol: You can see that my movements are…they’re quick swipes.
Anna K: And what this does is it actually mimics the hair so it looks like you’ve got thicker, fuller hair. Yeah, that looks really great, Carol.
Carol: And the brow fix just sets them…
Anna K: Just keeps it where you put it.
Carol: …for life.
Anna K: Yeah, it’s really great stuff. I love that stuff.
Carol: So that’s all pre-color.
Anna K: And we took our time here going through each step and each brush. It really takes a minimal amount of time. Especially once you get the routine down and you know which products you are using first.
Carol: What do you think? What did you learn today that will support you in keeping your skin looking healthy and youthful so that you can continue to share your beauty with the world? What type are you and what was your aha? Share it in a comment.